Table of contents:
Key takeaways:
- Reliability is key: Podcasting software should provide consistent, high-quality recordings even with spotty internet connections. Look for platforms that offer local recording to prevent quality loss.
- High-quality output matters: Software should support 4K video and uncompressed audio for a professional podcast experience. Avoid platforms that compress recordings too heavily.
- Ease of use for guests: The ideal software should allow guests to join effortlessly, preferably without requiring downloads or complex setups.
- Why Riverside stands out: Riverside offers local 4K recording, separates audio and video tracks for editing, and provides AI-powered tools for quick post-production, making it a top choice for professional remote interviews.
If your remote podcast interviews don't look and sound great, you're going to have a hard time competing or standing out from the throngs of podcasters vying for listeners.
In this post, we’ll discuss a few features to look for when choosing podcast software for your video interviews and compare different options for both Mac and PC users.
What is podcast interview software?
Podcast interview software is a program or application that enables remote recording between podcast hosts and their guests. Podcasters, content creators, journalists, and marketing professionals use these platforms to record interviews or debates with subject matter experts or other guests.
Technically, many remote video recording platforms allow this, but some are designed specifically for podcasting. Dedicated software simplifies the process of recording and editing the interview, streamlines the interaction between the host and their guests, and ensures polished and professional results.
Different podcasting platforms offer different interview-specific features, such as built-in tools for scheduling interviews, livestreaming to social media, automatic transcriptions, and so on.
Read on to understand how to choose the best video recording software for your unique needs.
What to look for when choosing video podcast recording software for interviews
There are many podcasting software options on the market today, but they’re not all created equal.
When comparing podcast video recording software options, you’ll want to look for a few characteristics that could make or break your podcasting experience:
1. Reliability
Good software must ensure consistent, reliable results, both during the recording and the post-production stage.
For example, suppose the software depends on your internet connection speed to maintain the recording’s integrity. If your remote guest has a poor or unstable connection, you might end up with low-quality footage.
Choosing software that only works for you part of the time will just lead to inconsistent results and, often, quite a few headaches.
2. Recording quality
Possibly the most important feature for podcasters is whether the recording is as close as possible to studio quality. Of you're looking for top quality results, then you need software than can deliver 1080p or 4K HD video resolution and 48kHz audio quality, which are pretty much the standard these days.
Your audience isn’t going to have much patience for grainy audio or choppy SD video that’s difficult to make out.
Many platforms compress recordings, making the file size smaller, for ease of transmission. However, that means some data is lost in the process, leading to quality loss. When searching for podcasting software, choose one that records in lossless, uncompressed audio and video.
3. Overall ease of use
Your software must be easy to use, or you’ll have to spend hours giving your guests a crash course in using it from their end (possibly causing the guest to leave in the process).
If you need half an hour to set up a call and a degree in audio engineering to work the soundboard, it’s probably not the right software for a podcast interview.
4. Control for the host/producer
Many software programs boast about their interface’s minimalism and ease of use – and that’s definitely a good thing. However, you definitely want to have as much control over the recording elements in real time as possible.
Choose software that employs a healthy mix of both customization and ease of use. If you can find a tool that allows a producer/editor to assist you with the interview from behind the scenes, that certainly can't hurt.
5. Integration with editing tools
No content is ever perfect right after recording, and the ideal software should make it easy to edit yout video quickly and seamlessly. The best podcast software for remote interviews streamlines post-production with AI-powered automated features while still giving you complete control over the final result.
Look for platforms that integrate with editing tools or include built-in editing features. Trimming, cutting, and adjusting video and audio without exporting files to a third-party application will save you precious time, money, and effort.
6. Compatibility with devices and operating systems (Mac, PC, mobile)
While you probably feel at ease using your setup during the recording, you may never know what your guest’s favored devices are going to be. Your podcasting software should be flexible enough to work on all possible setups, devices, and operating systems.
Browser-based functionality is also a big plus since it simplifies access, prevents compatibility issues, and avoids the need for downloading and installing any extra software on your device.
6 Best Video Interview Podcast Software (Mac and PC)
We recommend choosing a more podcast-focused platform when it comes to recording podcast interviews. Either way, let's take a look at some of the most popular and best software you can use to record video interviews on Mac or Windows PCs:
Riverside
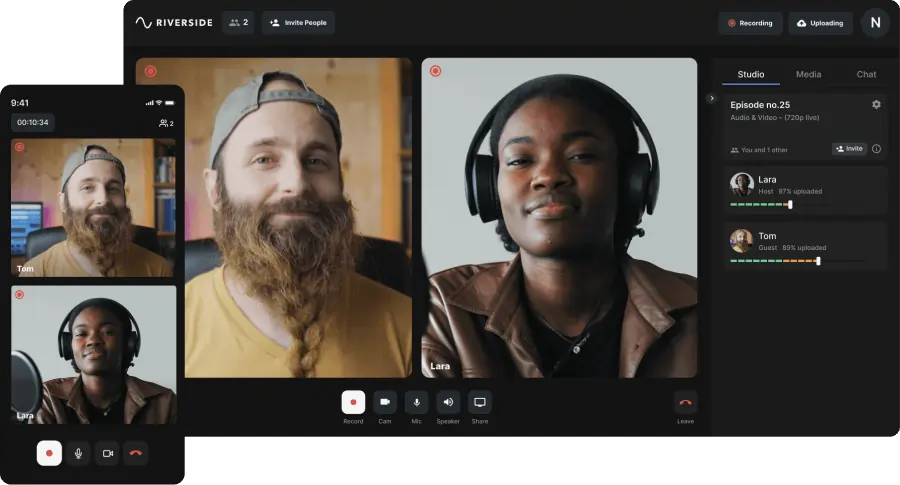
Riverside is a reliable video podcasting solution designed specifically for podcasters. It has many features and is easy to use. Thanks to its AI-powered editing tools, you can complete post-processing in less than an hour.
You can record video interviews with up to 10 participants locally, so your recording quality doesn’t depend on your internet connection. You can download separate audio and video tracks for each participant as raw, uncompressed files for maximum quality and fine editing control.
Riverside is also browser-based, so guests don’t need to download anything. They can join by clicking on a link.
Reliability
Riverside is one of the most reliable platforms out there – you can count on it having your back during even the spottiest recording!
Each participant has his or her own separate audio track, making the podcast easy to edit and mix later. Also, since tracks are recorded locally and not over an internet connection, any glitches or drops in connection won’t affect the quality or interrupt the audio.
Recording quality
Riverside records video in up to 4K, studio-quality resolution, allowing you to produce stellar videos. The audio is uncompressed (meaning nothing is lost) and delivered in WAV format.
Amount of control for the host/producer
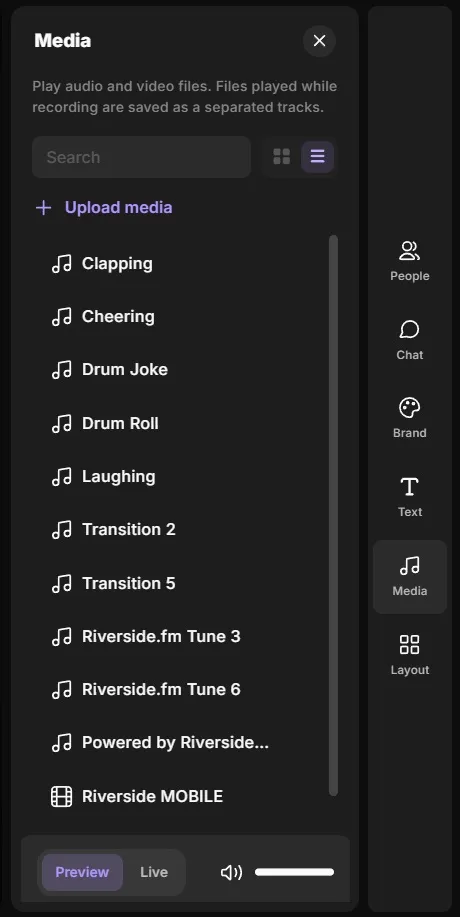
- During the recording: You can invite a producer to join your sessions behind the scenes and control the frame rate, max resolution, and guests’ equipment. Riverside also comes with live sound monitoring, meaning you can monitor your microphone and adjust levels as you record, and a media board to add live sound and visual effects as you record.
- During post-production: You’ll have access to separate uncompressed audio and video feeds for each participant. This means you can mix, merge, and edit each track separately for maximum control. Screen records are also recorded as a separate track.
Ease of use for the guest
Riverside was built with a simple guest interface in mind. Guests can join with a single click, meaning there’s no need to download an app or lengthy onboarding processes. Full transcripts of your podcast are generated automatically and can be used for quick subtitles or captions.
Tracks are automatically uploaded to your Riverside dashboard as you record, so you don’t need to wait for an upload before you close your browser tab.
Integration with editing tools
Riverside's built-in text-based editor includes automated tools for fine-tuning and polishing your podcast as easily as editing a transcript.
With the Magic Clip tool, you can also repurpose your podcast into short, shareable clips for social media with a few quick clicks.
And if you need to do some professional-grade editing, you can export your files from Riverside to advanced editing software like Premiere Pro.
Compatibility
Riverside is a browser-based platform fully compatible with Windows and macOS operating systems. You can even use your iPhone as a webcam during your recordings!
Plus, with its iOS and Android podcasting app, you can record video interviews on the go.
Pricing
Riverside has a tiered pricing structure, starting with a free plan and paid plans starting at $15.
How to record a video interview podcast with Riverside
Recording a video podcast interview is very easy with Riverside. Just follow these steps:
Step 1: From your Studio, click on “Plan” then “Schedule session.” You can also click “Invite to record” if you want to send an invite right on the spot via email or by sharing a link.
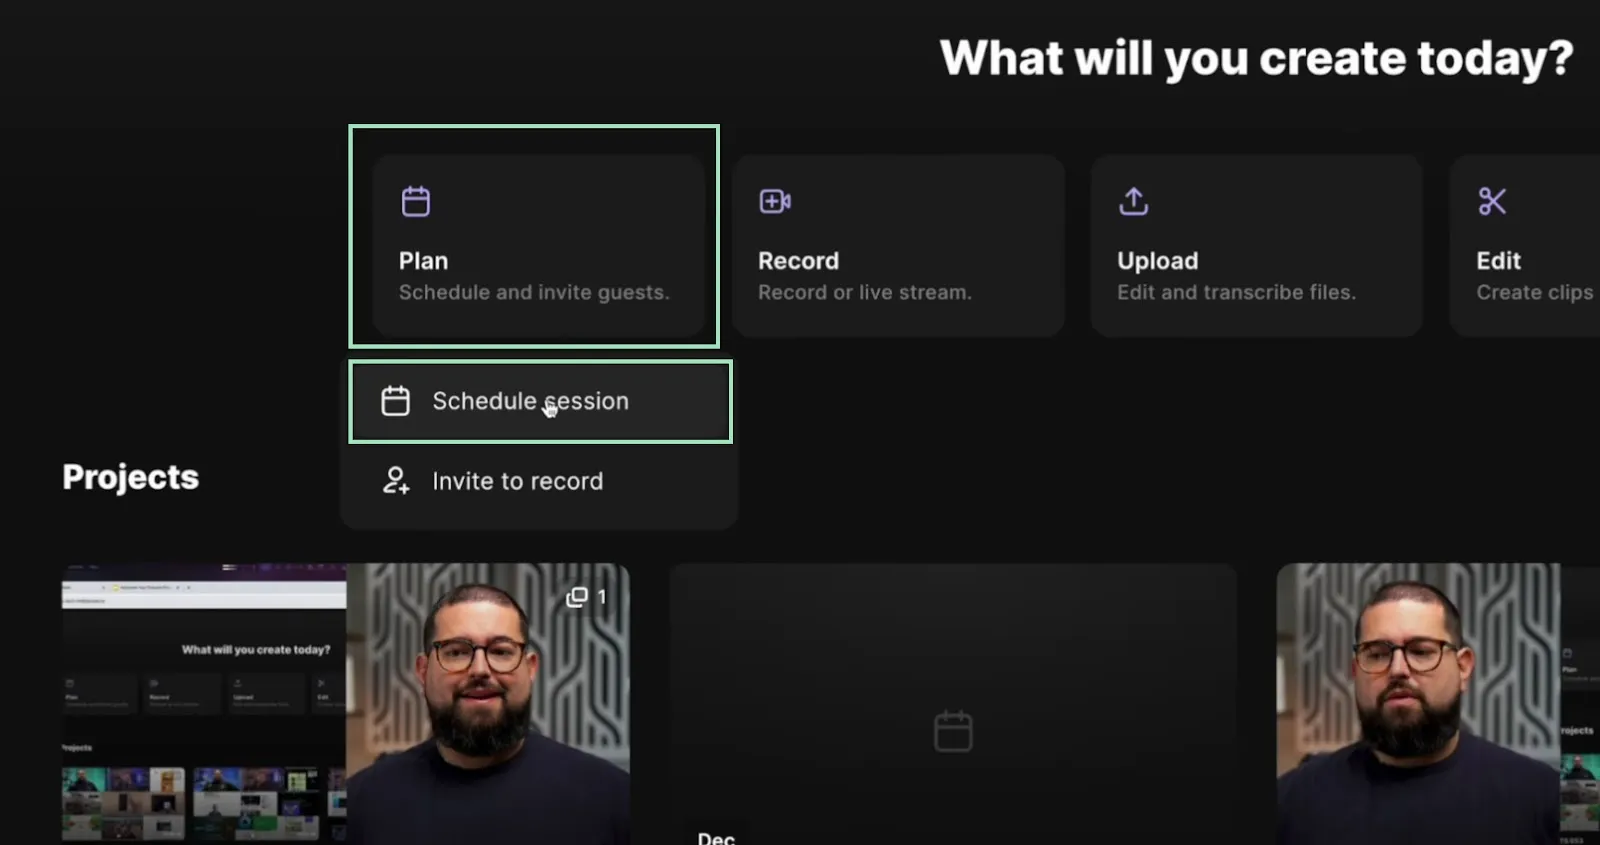
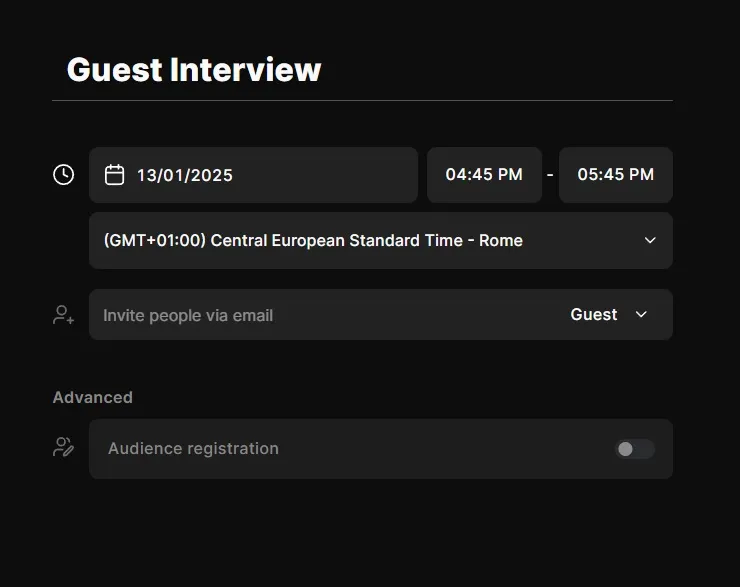
Fill in the date, time, and time zone for when you plan to host your podcast interview. Then, add the emails of the people you want to invite as guests, co-producers, or audience members and click on “Create session.”
Your guests will receive a reminder email with the date and time, a button to join the interview, and clickable links to add it to their Google, Outlook, or Yahoo! Calendar.
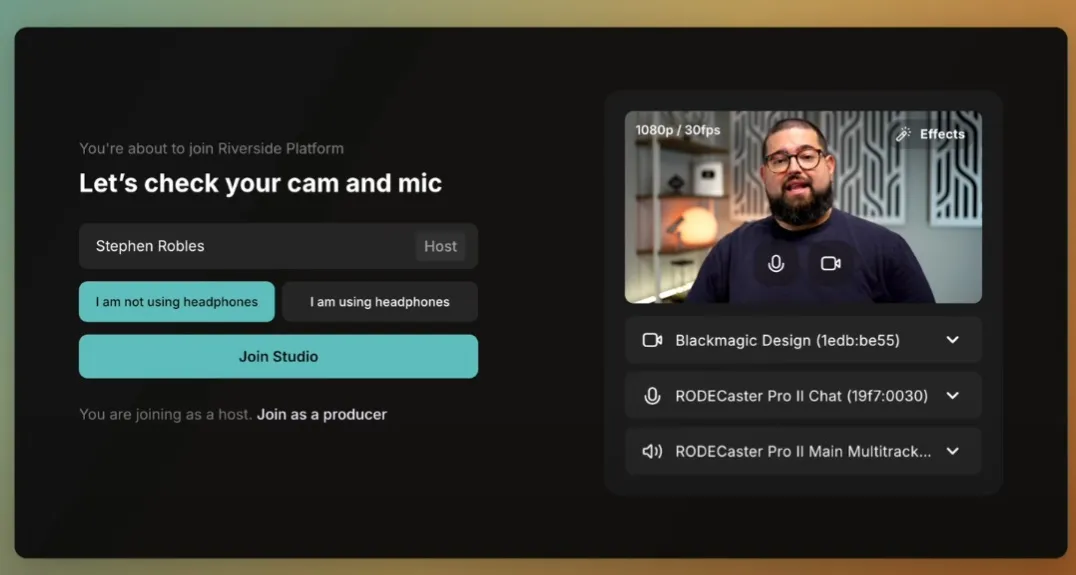
Step 2: When the day of the interview arrives, select the “Scheduled” tab from your left sidebar, hover over the scheduled session banner, and click on “Join session” to launch your lobby.

Step 3: Here, you can select your webcam, microphone, and speaker output, as well as whether you’re using headphones. Once you’re ready, click the “Join Studio” button.
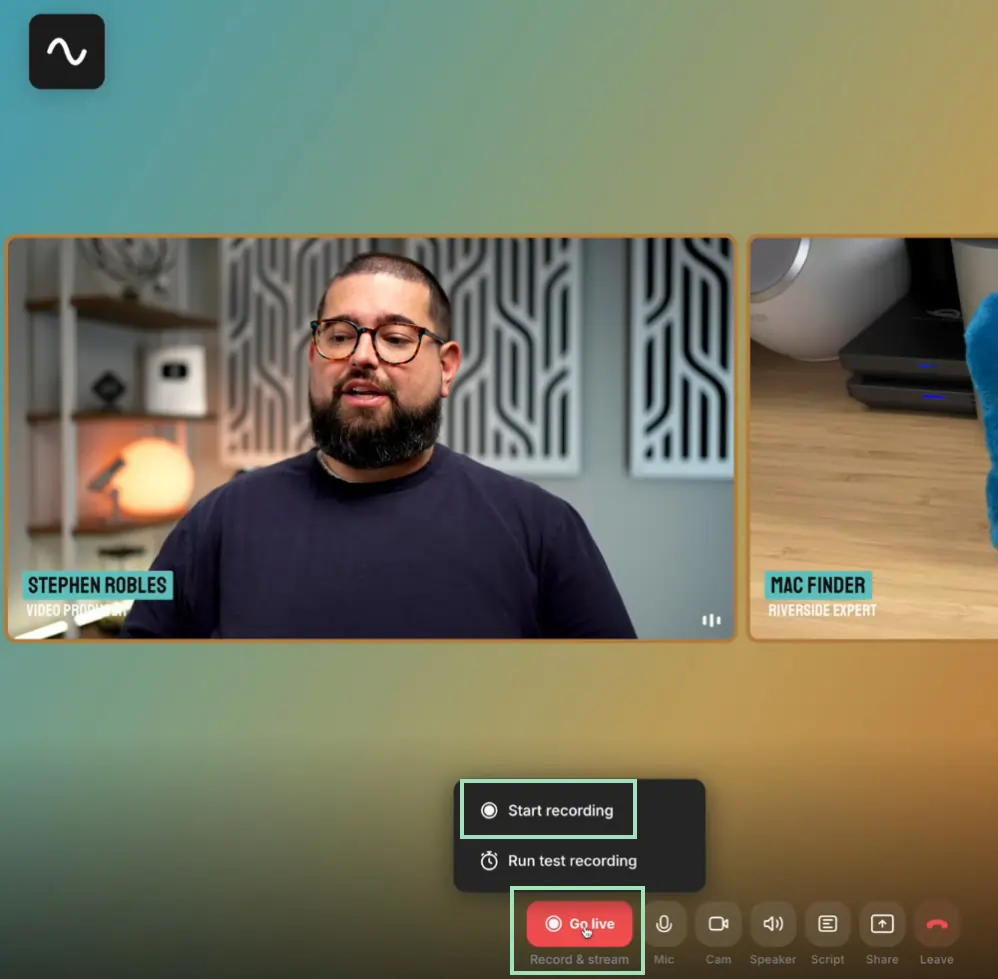
Step 4: Once your guests have joined the session and you’re ready to record your interview, click the red “Go live” button at the bottom and select “Record.”
Step 5: During the recording, you can select the tabs on the right sidebar to add media, change your guests’ layout, brand your interview, and more.
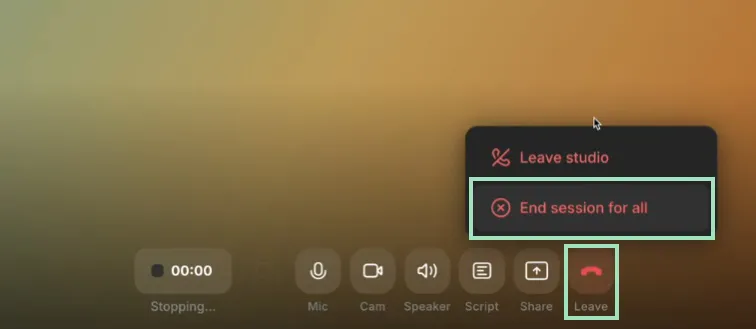
Step 6: When the interview is over, you can close it by clicking the “Leave” button at the bottom and selecting “End session for all.”
Did you know podcasters like Gary Vaynerchuk, Jay Shetty, and Tim Ferris all use Riverside? Join them and start recording professional video podcasts seamlessly.
Zoom
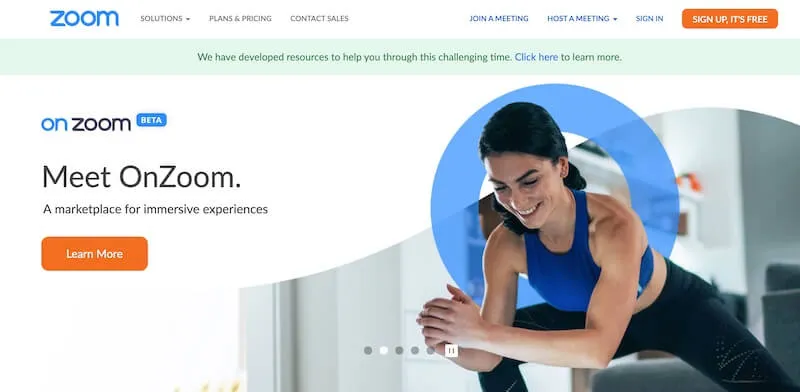
If you’ve done any remote meetings with your co-workers, you likely already have Zoom installed on your computer—and so do your guests. Although relatively basic, it’s one of the most popular video conferencing software for macOS and PC users alike.
Since Zoom lets you record video calls, it’s possible to use Zoom for your podcasting needs as well—provided you’re okay with a resolution capped at 1080p for paid subscriptions.
Reliability
While Zoom offers above-average audio quality and better internet consistency than Skype, it still takes place over a live internet connection. This means that the quality of your recording depends largely on the quality and speed of your internet signal, and it will be automatically downgraded if the connection isn’t optimal.
This means that if bandwidth is poor, your video will start looking choppy, and the audio sound grainy. If you experience a lag or internet disconnection, the audio or video file will be interrupted or fail completely.
Recording quality
Since Zoom was designed for virtual conferencing rather than studio-quality podcast recording, it sacrifices quality to improve speed and ease of use. Audio and video are compressed to make the file smaller and easier to transfer across the internet signal.
Recording quality is locked at SD for free users but can be upgraded to 720p for Pro users and up to 1080p for Enterprise and Business users. In other words, if you’re looking for the highest-quality recording for your podcasts, you’d do well to look elsewhere, or pay for a business account.
Amount of control for the host/producer
- During the recording: The host can invite others, mute and unmute all participants, share the screen, and control the live stream. A waiting room feature lets you control when participants join. You can also adjust the speaker’s volume in real-time.
- During post-production: Zoom allows you to edit your recording in-app with the paid plan, or you can download the MP4 and export it to your favorite editing software.
Ease of use for the guest
Most guests will already be familiar with how to use Zoom, which is a plus.
Simply invite guests by clicking “Invite” in the Participants tab. Select a participant to invite from your contacts or via email. Your guests can then join the call with a click.
Integration with editing tools
Zoom’s built-in editor is very bare-bones and only allows for simple editing like cutting, trimming, splicing videos, and some basic audio adjustments. Even integration with external editors is quite limited since all files exported by Zoom are compressed.
Compatibility
One of Zoom’s strongest points is its compatibility. It runs on virtually any device and operating system, both mobile and desktop. A browser-based option is also available, allowing guests to join without downloading the app on their devices.
Pricing
Zoom comes with a free ‘Basic’ tier. Paid plans range from $15.99 to $21.99 per month.
Skype
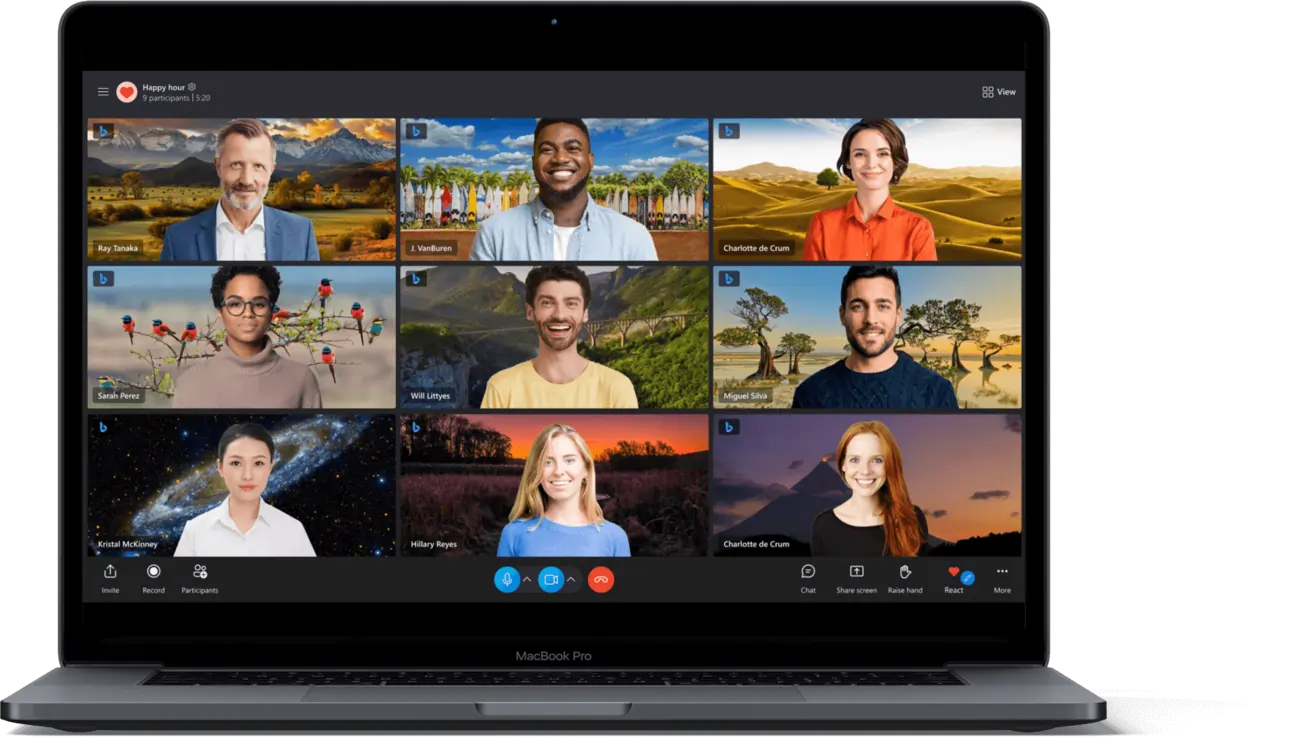
Another popular video conferencing platform, Skype, is infamous for being the least reliable software (even worse than Zoom) in terms of connectivity and speed.
However, since it’s been around for over twenty years, many people are familiar with it and still love to use it. Skype is an affordable choice for beginners. The quality of Skype calls can be improved by using external call recording software or dedicated audio recording equipment, such as a mixer.
Reliability
Asked anyone who has used Skype about it's reliability and you'll quickly learn that it has a reputation for being unstable. If you have a spotty internet connection or a computer with a low CPU speed, your calls will likely be dropped often, interrupting and possibly damaging your podcast recordings.
Recording quality
Like Zoom, Skype was designed for virtual conferencing, not podcast recording. It has a built-in recorder, but the audio and video files produced are compressed, making for lower recording quality for your podcasts.
Just like Zoom, HD is available only with paid subscriptions (e.g. Skype for Business), and it’s locked at 1080p.
Amount of control for the host/producer
- During the recording: Nothing much beyond the basics. You can invite guests, mute and unmute participants, and share your screen.
- During post-production: You can download the MP4 file of your Skype recording and export it to your favorite editing software. However, like Zoom, the files are compressed heavily.
Ease of use for the guest
Skype makes it easy to invite guests with a click; they don’t need to download the software. Most people are familiar with this video-calling software, as it was the platform of choice for most of the 2010s.
Skype also allows users to call phone numbers, so it’s easy for people to connect with their mobile or landline phones.
Integration with editing tools
Skype does not include built-in editing tools, and while the output files can be imported into most third-party software for post-production, they are compressed.
Usually, you need to pair Skype with external call recording software or hardware to improve the overall quality of the recording, but this will add unnecessarily complicated steps to your workflow.
Compatibility
Skype is compatible with macOS, Windows, Android, and iOS, making it quite versatile for use across multiple devices.
While a browser-based option is available, it is also not particularly stable and is much more limited than other platforms like Zoom or Riverside.
Pricing
Skype is free to use online. If you need to make calls to a mobile or landline number, you can purchase subscriptions or pay-as-you-go options starting at $3.59 per month.
Ecamm Call Recorder
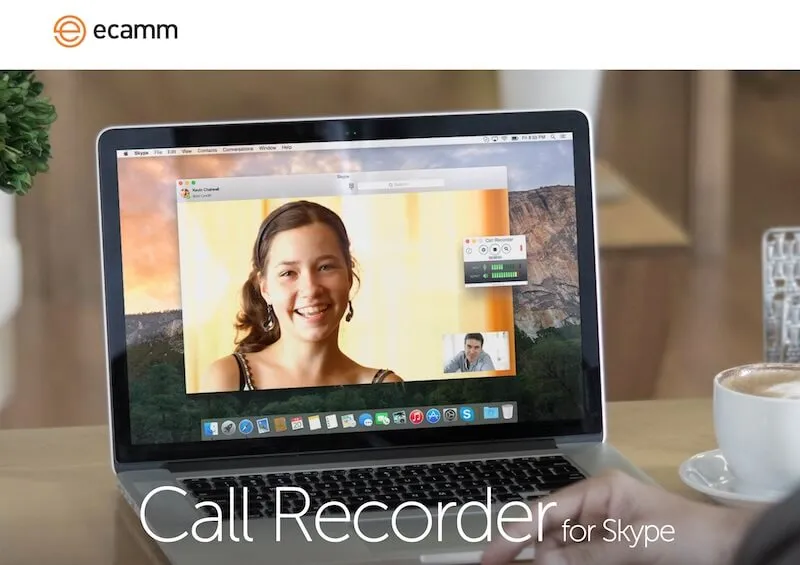
Ecamm is designed to help you record remote video calls on some of the more ubiquitous call software already available.
Ecamm Call Recorder for Skype is a minimalist add-on program that lets you record your video call within Skype itself (no toggling between applications) and then saves the recording as a QuickTime file. It adds a recording window to Skype that saves exact reproductions of incoming and outgoing calls and allows recording in side-by-side, split-screen, or remote views.
Reliability
Since this software is an add-on to Skype, it depends on Skype’s reliability. Unfortunately, Skype is infamous for not being as dependable as other virtual conferencing software. If your internet connection is poor, your conference call will suffer.
Recording quality
Ecamm records in HD to give clean, 1080p-resolution videos. However, the quality of your guest’s video feed will depend greatly on the connection quality of your Skype call, which is unlikely to be perfect.
However, each participant’s audio and video are recorded on separate tracks and, unlike Skype, can be exported as uncompressed files, so quality is still a huge step forward compared to using only Skype.
Amount of control for the host/producer
- During the recording: Since the application is meant to be an easy add-on to Skype, the real-time control is at a minimum. You can record automatically or use the ‘Record’ and ‘Stop’ buttons.
- During post-production: The built-in audio editor lets you edit each track separately, then convert it to uncompressed MP3 or AAC files for export.
Ease of use for the guest
Ecamm is very easy for both the host and the guest to use. If you’re looking for a simple add-on that doesn’t interfere with the call interface, Ecamm is an excellent option. It simply allows you to press ‘Record’ while you’re on a call.
Integration with editing tools
Ecamm includes a built-in editor that allows for trimming videos, adjusting audio levels for participants, and converting files into multiple formats (e.g., MP3, AAC, QuickTime).
Since audio tracks are recorded separately, and all files can be exported uncompressed, post-production edits can be quite detailed, even if they must be done on an external editor. It also features a full integration with Ecamm Movie Tools.
Compatibility
Ecamm Call Recorder is compatible only with Skype on macOS and is solely designed for the desktop version. It can’t be used on mobile or Windows desktop PCs and doesn’t support other conferencing platforms like Zoom or Google Meet.
Pricing
Ecamm comes with a free trial, or you can buy the software for a one-time purchase of $39.95.
QuickTime X
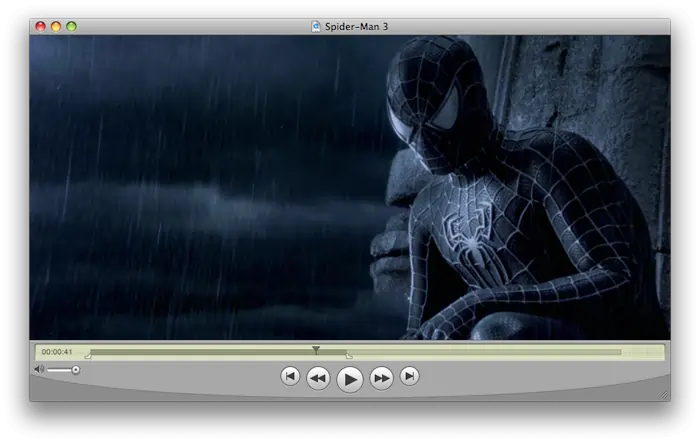
Quicktime is a free application that comes pre-installed on all Mac computers, so there’s no need to download any additional software if you’re an Apple user.
While easy and user-friendly, QuickTime X is not designed to run video calls. If you and a guest want to record a video podcast remotely, you’ll need to use another calling software or record your call separately.
Reliability
Like most Apple products, QuickTime is streamlined and reliable. As your computer's default audio/video recording software, it should automatically and consistently work well with your Mac.
Plus, the videos are recorded locally, so quality is preserved intact regardless of your connection speed (you can even record offline).
Recording quality
By default, QuickTime uses your computer's built-in camera and microphone. However, you can connect external equipment and select those sources in the Options pop-up menu to record better-quality video.
Recording quality can reach up to 4K resolution, depending on your hardware. You can also adjust the quality settings:
- High: H.264 video and 44,100 Hz AAC audio (compressed)
- Maximum: Apple ProRes 422 video and Linear PCM audio (uncompressed)
Amount of Control for the Host/Producer
- During the recording: There is very little control over the host/producer during the recording itself. You can start the recording, control the volume, and choose the audio and video sources.
- During post-production: QuickTime only includes an essential trim tool for quick edits directly on your Mac. You can export MP4 or MOV files to third-party editing software for more complex editing.
Ease of use for the guest
Since it has been the default application for video and audio recording on the Mac for decades, QuickTime X is simple and an excellent option for beginners who want to try video podcasting.
However, setting up a remote interview can be a real chore. Each participant on the call must record their audio and video and send the files to the host after the recording is over.
Integration with editing tools
QuickTime X editor is so basic you can only trim your output – and that’s pretty much all it does. However, you can export your files uncompressed for professional editing using external software. To do so, make sure that “Maximum” quality is selected before starting your recording.
Compatibility
Compatibility (or lack thereof) is a significant drawback of QuickTime X since there's no mobile app, and it only runs on a macOS desktop computer. So, if your guests aren’t Mac users, too, well, you’re out of luck.
Pricing
This application comes pre-installed on all Mac computers, so it’s free to use.
Google Meet
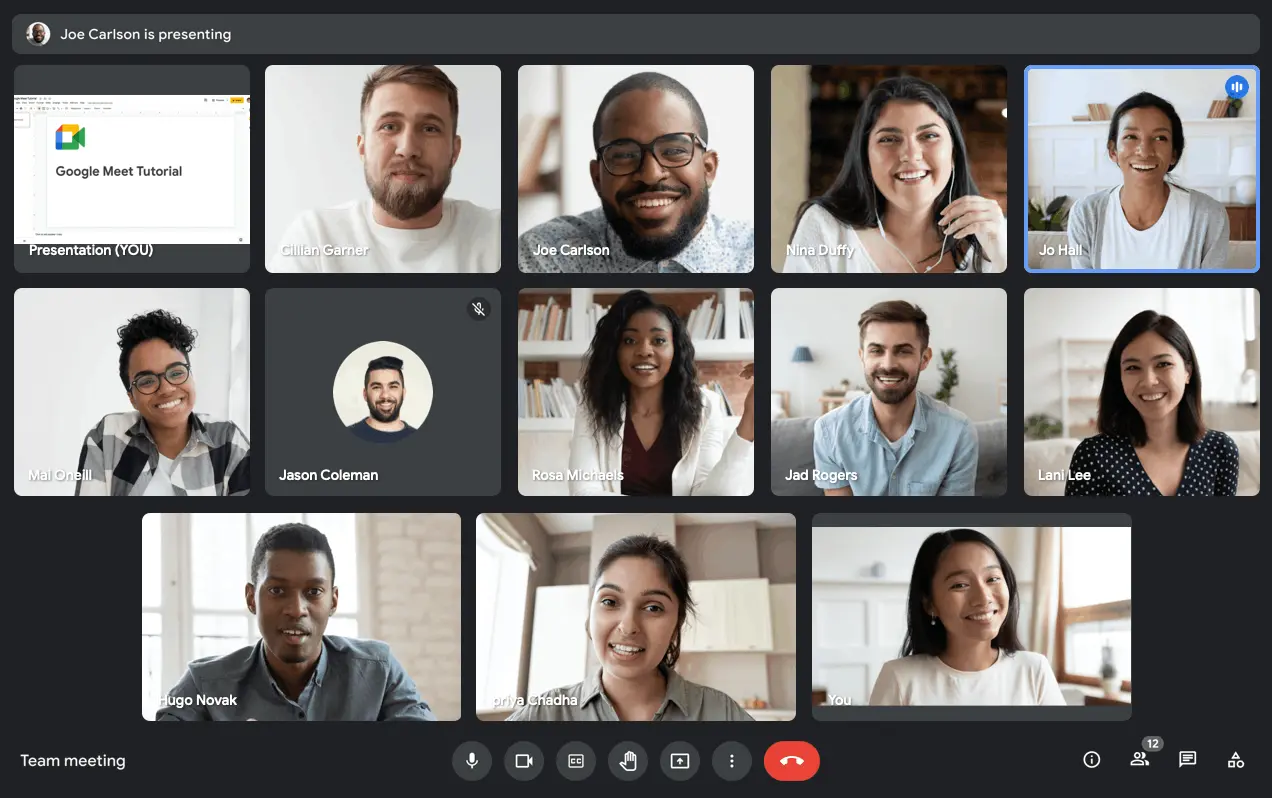
Google Meet is another popular video conferencing platform thanks to its integration with Google Workspace. While it is usually used for virtual meetings, recording is available with paid subscriptions, making it a potential choice for podcasters looking for simple and straightforward software to conduct remote interviews.
Since Google Meet is not explicitly designed for podcasting, it lacks advanced recording or editing features. However, the platform is easier to use and more reliable than Zoom or Skype.
Reliability
Google Meet is known for its stability and reliable performance, even on slower internet connections. Meetings are not recorded locally, so the quality of the recording depends on the stability of your connection, which is adjusted during the call.
Recording quality
Recording on Google Meet requires a Google Workspace plan (e.g., Business Standard or Enterprise). Sessions can be recorded up to 1080p, and an automatic noise cancellation feature can improve audio quality. Recordings are stored directly on Google Drive in a compressed format.
Amount of control for the host/producer
- During the recording: You can mute participants, control who can join, and share your screen offers. While there are no built-in options for audio mixing or advanced video settings, Google Meet features live captions during calls and a few tools to share slides and presentations.
- During post-production: Files are often very compressed, especially for video, so they might not be suitable for editing with professional tools.
Ease of use for the guest
Google Meet is extremely user-friendly, and chances are your guests will already be familiar with the Google Workspace environment. Since it’s desktop-based, it doesn’t require downloads, and guests can join directly by clicking a link.
Integration with editing tools
Google Meet does not have built-in editing tools, so you need to import your files into third-party software. However, since files are uploaded directly to Google Drive in a compressed format, detailed editing can be pretty challenging.
Compatibility
Google Meet’s versatility is one of its strongest suits since it’s compatible across various devices and operating systems. As a browser-based software, it works on nearly all modern browsers like Chrome, Firefox, and Safari, and it’s accessible to both Windows and Mac users. A fully functional app for on-the-go interviews and recordings is also available for both iOS and Android.
Pricing
You must purchase a paid Google Workspace plan to enable recording during meetings. Price plans start at $6 per user per month but require a 1-year commitment.
Conclusion
As a podcaster, you need specific features in your recording software. There are many podcast recording software options, but very few of them can meet your needs.
You want a reliable program that delivers high quality every time, with just the right mix of control and ease of use. Although we’re admittedly biased, we believe Riverside is the best choice. Plus, it's the only one of these options that has very versatile editing options integrated into the software.
What are you waiting for? Start for free with Riverside today to test it out for yourself.
FAQs on the Best Video Podcast Interview Recording Software
Looking for more information? Check out these frequently asked questions:
How do I record a remote interview for a podcast?
It's easy to record a remote interview for a podcast with these steps:
- Sign up for, or download a dedicated remote podcast software like Riverside.
- Set up a remote recording studio on your chosen platform.
- Schedule your interview, and invite guests to your remote podcast studio when the time comes.
- Test out your equipment, and then, when ready, start recording.
- Stop the recording and download your files for post-production.
Read More: How To Record A High-Quality Podcast Remotely
What is the best platform to record video interviews for podcasts?
While there are many podcast recording options, we’d say that Riverside is your best for recording remote podcast interviews. Riverside offers local recording, so you’ll get high-end resolution video and audio no matter what your internet connection is.
You can also download separate tracks of each podcast guest and host for smoother editing, or you can edit directly after recording with Riverside’s text-based editor.
How do I record a Zoom interview for a podcast?
Zoom’s recording features allow you to record an interview for a podcast. You can record in HD (720p or 1080p) if you purchased a paid subscription. We suggest optimizing your Zoom recording by enabling original sound and background noise.
Read our article on Zoom Podcasts to learn how to record a podcast interview on this platform.
Can I record on Spotify for Podcasters?
Yes! Thanks to the integration with Riverside, you can record your remote podcast interviews directly on Spotify for Podcasters.
Just log in to your Spotify for Creators account on the web, click “New episode,” then select “Go to Riverside.” You can even create a Riverside account using your Spotify account, and when you’re done with the recording, import the finished episode directly to Spotify for Creators.


-(1).webp)
.webp)


